Wednesday, August 17, 2016

Cleaning the collimator main group

The next bunch of RSS lenses to be attended to was the collimator main group - the most complicated of the lens groups.  This unit contains 2 singlets + a triplet consisting of a sodium chloride lens (yes: SALT!), sandwiched between 2 spectacular chunks of calcium fluoride, with coupling fluid filling both the gaps (the butter in the sandwich, if we're inclined to overdo the analogy).

A dusty eyeball
The collimator doublet leaked some of its lens fluid at some point & this oily liquid had found its way down onto the top of the triplet - seen here as the messy streak at 6 o'clock.  Ugh :{

We've found the mystery smudge!
A set of "before" throughput measurements was made on the dirty main group, then Ockert could dive in & do his cleaning magic.

Okkie super-focused on the task!
The powerful combination of sodium lauryl sulphate, de-ionised water & alcohol once again did the trick, even removing the nasty streak of dry lens fluid.

Washing windows
The curvature on the top CaF2 lens in the triplet is really extreme!

Going after those hard-to-reach places
With the outer surface clean, one can more easily see the small droplets of the original lens fluid that still stubbornly refuse to mix with the new coupling fluid.  Fortunately these don't seem to have a huge effect on the optical performance.

Streaks & droplets of the original lens fluid are impossible to remove
The throughput tests were repeated after the cleaning & showed a huge improvement across the entire wavelength range - a gain of approximately 8%!  Awesome :)

Throughput measurements before (red) & after (blue) the cleaning of the main group
An already brilliant day that'd included thunder, lightning & loads of rain (technically impossible in the middle of winter!) + excellent throughput gains got even better when Ockert spotted a meerkat through the north window of the control room!  The more we looked, the more of them we saw & pretty soon a bunch of us were staring at a bunch of them.  From the pic below, one might argue that they were staring at us!  Absolutely delightful creatures :D

Who's watching who?!
So there you have it - we're finally starting to develop SALT/MeerKAT synergies!  We haven't seen these little guys out here before, but presumably they're heading north towards Carnarvon to go run their telescopes?

Tuesday, August 16, 2016

A new telescope in the family!

While Ant waits for various RSS mechanisms to become operational again & thus testable with the software, he's getting plenty of drawing/painting done!  Here's another view of the plateau, looking towards the south this time.  

Another angle on the plateau
The middle dome in that scene is the site of much excitement & activity as the SAAO's beautiful new 1-m telescope was installed in there earlier this month.  

The installation began on 2 August
Hannah's quiet but absolutely heroic efforts in leading this project, along with the dedicated APM Telescopes team + great support from numerous SAAO staff has made this wonderful new facility a reality.

The telescope was engineering-operable within 2 days!
The weather played along & First Light was achieved on Thursday 4 August.  An enthusiastic crowd visited the dome the next night & delighted in seeing NuBlu in action!

NuBlu begins exploring the southern sky
Saturn through the eyepiece was truly spectacular - thanks in no small part to the corrector optics that Darragh designed for the telescope...  Well Done to the whole team & thank you for sharing the excitement with the rest of us :)

A cellphone pic of Saturn through the eyepiece!
We wish you the best of luck with the extensive list of commissioning tasks that lie ahead!

Monday, August 15, 2016

One RSS lens group done!

Ockert, Janus & Jono finished cleaning & throughput testing the collimator doublet, so it could be re-installed in the spectrograph.  Its alignment was checked against the optical references set up with the alignment telescope - no adjustment required :)

Janus & Ockert checking the alignment of the collimator doublet after re-installation
It looks great again, all clean & with fresh lens fluid on board!  The cleaning of the two lens surfaces yielded a 2% throughput increase for this lens group.  The throughput of the collimator optics is being measured with an extremely nifty new lab spectrograph setup (more on that another day).  Next up they'll remove the other 2 lens groups, the field lens & the main group (consisting of the triplet & 2 singlets).

The clean & fresh collimator doublet back in the instrument
Here's the new base plate for the Fabry-Perot etalons, shortly after being painted.  This plate is made of invar, to eliminate the thermal instability inherent in the existing mounting hardware & which has wreaked havoc with the alignment of the etalons in the past.

The new etalon base plate is made of invar to be insensitive to temperature changes
All the while Wouter's quietly & efficiently capturing measurements & updating the CAD models for all of the RSS mechanisms while they're accessible.  Here he's got the poor slitmask elevator in plenty of pieces!

Where bits go to be modeled!
Up on the tracker it was time for the fiddly job of putting the M5 outer baffle back in place.  The ring's split on one side so that it can be twisted open & rotated in through the hole that the M4 steering wheel locates in.  Then 4 *tiny*, obnoxious little bolts have to go in to secure the baffle, grrr!

M5 outer baffle back in place
Here's the start of our carefully choreographed dance to safely transfer M4 from its box on the tracker platform to its mounting assembly above M5.

Eben takes a last look at M4 before passing it up to me in the payload
Fortunately the M4 steering wheel locates very easily in its mounting fixture & then one only has to insert 3 bolts (being careful of course not to drop them onto M5 below).  

With that - the SAC is Back!
On goes the big perspex cover to keep dust & muck out of there until its time to re-install the ADC & everything else above it... 

Is that a giant bug with a light sabre guarding the SAC?
In other exciting news on the hill...  Our resident pair of Verreaux's (Black) Eagles is keeping busy on the nest this year!

Black eagle on patrol
& today we got our first look at the new arrival - who's probably a few weeks old by now.  Doesn't have a single feather yet, just a white fuzzball, but already getting quite big!

Sutherland's 2016 Verreaux's eaglet!

Sunday, August 14, 2016

Cleaning M4

Washing M4 this evening was quick & painless, compared to yesterday's slog of doing M5.  Not only is M4 tiny by comparison (only about 120 mm in diameter), but being downward-facing it also wasn't particularly dirty.

Smudges around the edge of M4
That said, being so small but still having to reflect all of the light gathered by the primary mirror means that the marks on M4 roughly equated to segment-size blemishes on the primary.  So it too really needed a clean!

Harsher illumination to show the marks
M4 got the same treatment as M5, with alternating doses of DI water & sodium lauryl sulphate.  

Wet with DI water & ready to lather up with soap
Tried using isopropyl alcohol again to dry the mirror & this time there were no colourful streaks.  This confirmed suspicions that the trouble yesterday was due to residual dirt on the mirror that would've taken more intensive washing (which would've been too risky given the state of the coating) to remove.  Since M4 was extremely clean after its wash, the alcohol worked well.

Clean & dry
All of the marks were successfully removed :)

Still looks good, even when subject to a brutal camera flash
M4 also has no pinholes to speak of, so the coating's in really good condition...

Peering up at the dome, shutter, tracker & tracker access platform
We'll pop the M4 "steering wheel" back in its kinematic mounting assembly above M5 tomorrow & happily check the SAC cleaning task off the shut-down to-do list.

Saturday, August 13, 2016

Cleaning M5

It was like a very strange little picnic-for-one on a Saturday afternoon in Sutherland...  Up inside the non-rotating structure, with a whole assortment of goodies packed especially for the occasion: air, water, soap, alcohol, various expressions of cotton wool, 3 cameras, a bedroom pillow, a large trash bag, & (of course) duct tape!  The ergonomics were fairly dismal, despite having set the tracker to its minimum tilt to help level out the floor of the non-rotating structure.  Being at an angle of about 30 degrees from the horizontal meant that everything had to be carefully wedged into place to avoid having stuff sliding around & either falling down the hole onto M5, or out the open access hatch on the downhill side.  Luckily none of the tour groups that passed through the dome during the afternoon were aware that there was someone perched many metres above them, wearing a bright blue hairnet, rubber gloves, a face mask, a headlamp & fall-arrest gear clipped to a piece of the tracker (in case anything went badly while trying to restore circulation to their numb legs & feet after kneeling in there for hours).

Workstation for the in situ cleaning of M5
By way of introductions, M5 is the last mirror in the telescope (the final surface that light reflects off of on its way out of the spherical aberration corrector, en route to the instruments).  It's made of Zerodur & weighs 18 kg, has a diameter of 410 mm, a clear aperture of 375 mm & a 375.8 mm radius of curvature (hence its nickname "the salad bowl").  M5 was last cleaned in December 2009, while the SAC was off the telescope for the Image Quality Fix, so it badly needed a wash.  This is only possible if both the RSS & the rotating structure (aka the payload) are off the telescope, or else if the SAC itself is on the ground.  Hence we pounced on this opportunity to clean M5, which ought to give the overall throughput of the telescope a significant boost.  

Bath time for a filthy dirty mirror!
The cleaning was an extremely slow & delicate process, so it was necessary to work in sectors.  That allowed short breaks in between to regain mobility, & also to decant more of the cleaning fluids & to check in with Ant (who was down in the spectrometer room, sketching the payload!) to confirm that M5 & I were still alive & well up there.  

The most accessible part of the mirror was cleaned first & used to optimise the washing process
A bulb was used to blow loose dirt off the mirror before the wash cycle began.  Then the goal was to limit the amount of liquid involved in any given step, while still making sure that the dust & dirt was adequately softened & mobilised before trying to remove it.  De-ionised (DI) water was dabbed onto a sector of the mirror using numerous Webril pads (lint free squares of cotton wool) folded in half & wet along the folded edge.  The water loosens the dust & then the same technique was used to dab a sodium lauryl sulphate (soap) solution onto the wet area to help lift more of the dirt.  Each pad was checked along the way to ensure that the coating was not being disrupted - fortunately it showed no signs of degradation.

DI water & soap (sodium lauryl sulphate) dabbed all over a sector of the mirror to loosen the dirt
A lot more DI water was then dabbed over the soapy area to soak up the worst of the dirt that had been lifted.  More soap was then applied & the Webril pads were folded a second time to produce a smaller square that could be used to drag wipe the surface.  This involves dragging the wet pad over the surface, but with no downward pressure applied (other than the weight of the wet cotton wool).  The drag-wiping process was then repeated several times with DI water to again rinse away the soap & remaining dirt.  Small lint-free cotton wipes were then used (folded in half) to dab the wet sector dry, before using fresh isopropyl alcohol to complete the drying.

About to clean the last sector
After completing the washing & drying, it was obvious that the alcohol had left a lot of streaks & colourful residues on the mirror.  This was removed by wiping the surface again with DI water & then carefully dabbing up the moisture with the small cotton wipes (folded in half). 

Although artistically pleasing, the purple streaks caused by the isopropyl alcohol had to go - the rings of colour near the edge are a coating artefact that's safely outside the clear aperture of the mirror
The cleaning took just 3 hours & went remarkably smoothly.  The visual improvement is quite amazing & we can now look forward to establishing the associated throughput increase once we get back on-sky in a few weeks.
M5 looking a lot more like it should
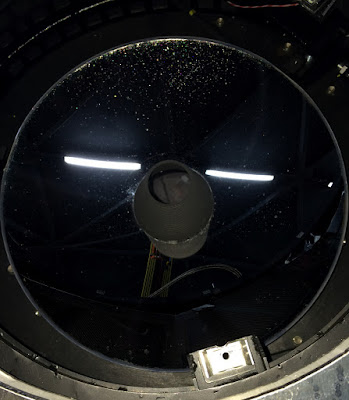
But M5's not out of the woods.  We already knew, from the only other time that the mirror was washed (in 2009) that the coating's not nearly as good as it ought to be.  It has an enormous number of tiny pinholes all over the surface...  They've been there from the start & we only see them again now that all the dust & dirt is no longer masking them.

Spot the plague of pinholes that mar the surface?
The pinholes are a lot more obvious when photographed with a flash - this makes the mirror look like a dense region of the Milky Way, as viewed on a dark night in Sutherland :|

Flash photography leaves the pinholes nowhere to hide now that the dust layer's no longer obscuring them
We'll definitely need to re-coat M5 in the future, probably with a simpler coating & possibly even just with bare aluminium if it turns out that we can successfully coat a surface that's as optically fast (steep) as this in house.  If we can make removing, re-coating & re-installing M5 (the most exposed of all the SAC mirrors) a routine operation, we'll be able to get SALT's throughput to a healthier level than it's ever been, & keep it there.

The M5 coating's far from what it ought to be, but at least it's vastly better than it was
For now though, the next task is to clean M4 & get it back where it belongs!

Friday, August 12, 2016

Testing the M5 coating integrity

Before diving in & trying to clean M5, we first had to check whether the >12 year old coating would hold up.  The edges are the most vulnerable & there was an area that's normally covered by the outer baffle where some glycol spots had hidden & dried after the great glycol haemorrhage of 2012.  The perfect place to explore the worst case scenario!

The ugliest area on the edge of M5, where drops of glycol had dried & eaten the coating
De-ionised (DI) water, then a sodium lauryl sulphate solution & then more DI water was dabbed on a small test patch to see what would happen... As with the primary mirror segments, where the lighter they are in colour, the dirtier they are (the cleanest ones appear black since they look up at the black dome), it was great to see a black patch on M5!

A first pass at cleaning that patch showed just how dirty the mirror is, but also how bad the glycol damage can be
But we could also see how the coating had been destroyed by the glycol spill as cleaning those spots removed many tiny flecks of aluminium.  A sobering, though not unexpected, sight.  Belated Well Done to Keith for managing to dab away most of the spill on M5 at the time - now we can see what much of the coating would've been like if it'd all been left to dry!

The coating had been destroyed where the glycol had dried & cleaning then removed small shiny flecks
Happily though, a test patch on a more normal looking area nearby held up perfectly well - no shiny bits on the cotton-wool pads.  

An adjacent area that was merely caked with dust did clean up without issue
The improvement is really compelling & we've agreed to not be deterred by the fact that already-dead bits of coating (under the dried glycol spots) could come off during the cleaning. Obviously we'll be extremely cautious throughout the process, & stop to re-evaluate if other areas turn out to be problematic, but the potential gain amply justifies the manageable risk.

Note the black patches at 6 o'clock where the test-cleaning was done
We really need to do this - tomorrow will be a stressful day :|

Thursday, August 11, 2016

SAC M4 out!

The RSS collimator doublet came out of the spectrograph & was taken to the clean room for inspection ahead of being cleaned & having its throughput measured.

RSS collimator doublet
The Spherical Aberration Corrector (SAC) M4 mirror in its kinematic "steering wheel" had to be removed to provide access to SAC M5.  M4 turns out to be quite messy too, so it will also get cleaned up before we put everything back together again.  For now though it's safely in its box - after a few pics were taken, the mirror was inverted to protect the optical surface & the lid was bolted closed.

M4 looking up from inside its box
The baffle around the outer edge of M5 was quite awkward to remove, but having done so we could clearly see just how much dust it had kept off the mirror!  We'll do a trial-clean on a small patch outside the clear aperture & then decide whether the coating's in good enough condition for us to proceed.  If that looks ok, we'll remove the central cone baffle & get on with the delicate task of cleaning M5 in situ.

M5 begging to be cleaned